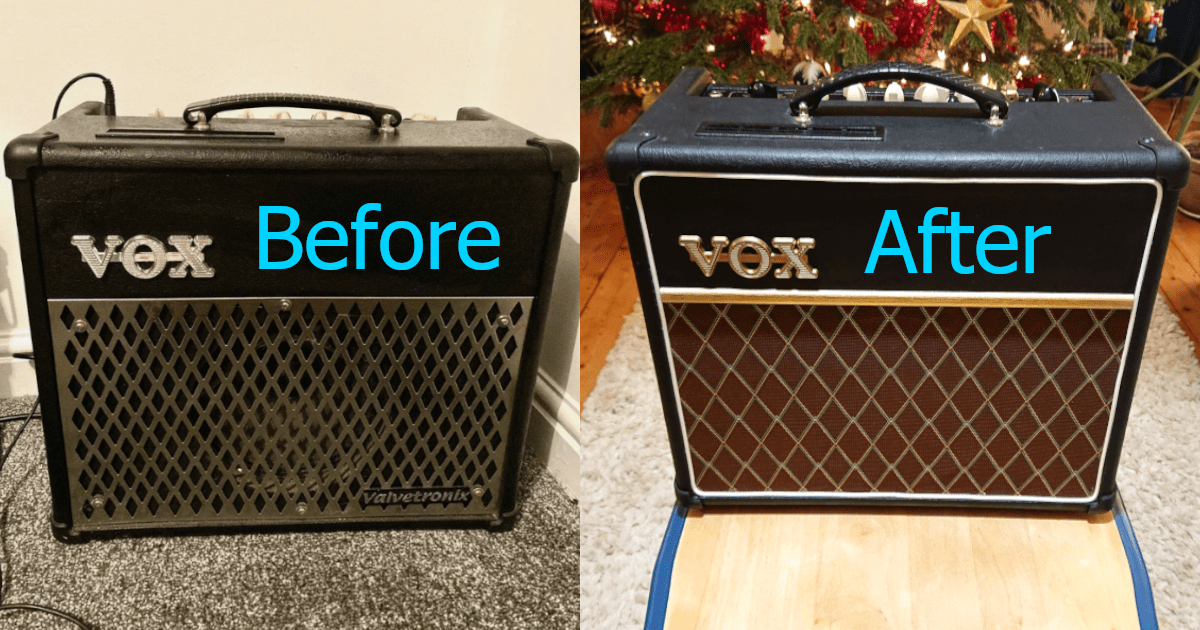
Custom Valvetronix VT15 Vintage Makeover (AC30 style)
This blog come from our in-house guitar technician Simon, who has recently taken up a brand new hobby: giving custom AC30 style makeovers to classic Vox Valvetronix amps! These amazing digital modelling amps have a fantastic sound for their low price points, but lack the aesthetic charm of their dearer cousins… So Simon has been coming up with a whole suite of amazing custom visual and sonic upgrades to make them look and sound just like the real thing. Here’s how he does it…
How the quest to make an AC30 from a VT-15 began…
 I first came across the Valvetronix range in 2008, a few years after their initial release, in the form of an ADVT15. At the time I needed a simple practice amp and getting one with reverb onboard seemed luxurious after attempting to make an entire demo on a tiny Peavey practice amp where the only means of having any echo at all was to play everything through a delay pedal, hoping the repeats would fool my listener into thinking they were stood atop a misty peak beholding the wonder of my picking clashing off distant mountain tops. It sounded instead like I was playing everything through a delay pedal and cheap Peavey amp with no reverb. Imagine my delight when taking my first disposable paycheck in years to the local music shop and discovering just how far things had come. An avid fan of British guitarists whose sound is synonymous with Vox amplifiers, the little silver faced Vox Valvetronix jumped right out at me. And it had reverb. And delay. Flanger, you name it. When the shop assistant went on to explain that it could model 11 different amplifiers, the mere £150 it cost me pretty much floated straight out of my wallet without my consent. I played it and played it and played it. I didn’t mind the fact that it looked like a cheese grater, I just saw the Vox logo shining forth and those cool chicken head knobs and thought it was the best buy ever.
I just loved that for £150 I had bought £10,000 worth of amplifiers all 11 models of which sounded exactly like the original. Well near enough. Fast forward to 2021 and I own an actual Vox tube amp and have spent long hours comparing it to a Valvetronix and I can tell you that whilst they don’t sound exactly the same, or as good, at the asking price these amps remain a miracle.
Before we go on, if you’re looking to get your hands on a neighbour-friendly Vox “cheesegrater” style practice amp with in-built drum tracks and loads of effects, we recommend the Mini5, available here.
How I began to make AC-30 style modifications to the Vox Valvetronix range
Over the years I have become something of a Valvetronix connoisseur, buying and selling various models, taking detailed mental notes of which ones sound best and experimenting with speaker swaps and modifications. Then one day, whilst browsing on ebay I spotted a Valvetronix amp that had been modded to give it a genuine AC-30/AC-15 Vox look. It was as though a hidden tier of Valvetronix ownership had been revealed to me. An easter egg. The secret level hidden in a favourite video game. The amp sold quickly and I did not spot another one for months. But the seed was sown. It was time to test my musical equipment motto to the limit: ‘It sounds better when it looks better’.
I used a VT15 for the project, my personal favourite all round choice, it has a similar control layout to the popular ADVT series, with the addition of an independent reverb control, enabling the user to combine delay and reverb. Distant mountain tops were drawing closer.
My objectives were simple:
- Make it look fantastic
- Spend less on the mod than the cost of the amplifier.
The upgrades included in my custom Vox VT15 facelift
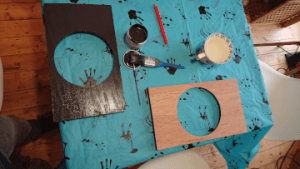
I started by shopping online for diamond grill cloth. Thanks to the growing increase in quality Chinese goods you can now buy diamond grill cloth from Ebay without having to spend twice what you did on the amp.
 With the grill cloth ordered it was time to tweak the sound before focusing fully on cosmetics. The one notorious drawback of the early Valvetronix models was the boomy nature of the low end, which enthusiasts soon discovered could be tempered by removing the back panel. As well having a hidey-hole to store guitar pedals in, the clearer and airier tone of an open backed amp immediately appealed and so I created an open backed look by sawing the middle of the back panel out with an electric saw. This created the small cosmetic issue of revealing the grain of the cheap mdf that forms the cabinet so I painted over that with some black furniture paint I had handy. On to the speaker, I opted to replace the stock speaker with a Celestion 8, a neutrally voiced speaker that helped tighten up the bass and bring clarity without interfering with the sonic balance of each amp model. Price wise I got lucky with a used one from Ebay which ended up costing £10 offset against the sale of the stock speaker.
With the grill cloth ordered it was time to tackle the gold fascia strip. This posed a big problem as certified ‘Vox fasica strips’ sell for a price comparable to actual gold online. I discovered some wooden floor joining strip in a department store with almost the same dimensions. I cut this to size and painted this gold using a pot of furniture paint.
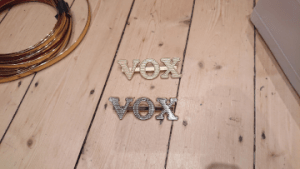 I opted to make the logo gold by spray painting it. This required me to prize it off using a spatula and kitchen knife. It is held on by three pins, the middle of which is glued in extra hard. Tense moments passed as I slid the kitchen knife under the logo and slowly added more and more leverage. Just as I became certain that the logo would break the middle pin let go with an almighty snap and my Vox branded prize came away with two mounting pins still intact. I spray-painted the logo gold and all the important Reverb knob as well. Take that, cheap Peavey amp. With the knobs being mounted on top of the amp on a vox I personally like to break up the bank of mono coloured knobs to make it easier to quickly locate each control by using different colours so I swapped the white Amp model and Master volume knobs with Black knobs.
 To mount the grill cloth I bought some 3mm thick MDF from B&Q which you can get machine cut to size in the store. I removed the old metal grill and speaker, offered up the new board and traced the line of the speaker hole from inside the amp with a pencil. I cut the hole out with a jigsaw and painted the board black. My childhood Christmas present wrapping skills were about to come to the fore as I lay the board down onto the grill cloth, cut along the corners at 45 degree angles and glued the fabric to the board using a hot glue gun.
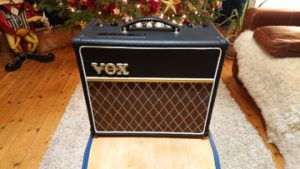 The next step was to add white piping to the edge of the amp. This was one of the trickiest parts to source. Not wanting to spend above the odds on ‘genuine Vox piping’ I spent some time searching for a malleable thin white cable trying everything from data cable to electrical cable before finding a shopping bag full of castaway washing line in my childminder’s front garden. The Vox gods had shone their blessing unto me and revealed the answer to my affordable modding prayers. The washing line cable was bright white, with no printed logo, easily malleable and the perfect size. I worked my way around the edge of the amp with the glue gun until the piping was glued down.
With this done it was time to affix the logo and fascia strip and breathe out as the Valvetronix stepped forth in its new livery, armed to the teeth with 60’s mojo and ready to rock through the ages.
Buy your Vox AC15 or AC30 replica from our guitar shop in Sheffield today!
Want to get your hands on your very own stunning Vox Valvetronix AC15 / AC30 replica? They cost just £125 or £140 with affordable delivery options available for the UK and abroad. This is a really good approximation of the classic sound and perfect looks at less than a fifth of the price! These amazing custom built amps are not available anywhere else, so contact us today to order your Vox amp custom build.